Ivanti Automation Integration
Ivanti Automation (IA) Integration enables Ivanti Neurons for ITSM customers to create requests for every day manual tasks like Account Unlock, Reset Password, Computer Provisioning and more. Using the integration of Neurons for ITSM with Ivanti Automation, administrators can automate these tasks to remove the manual steps.
•Configuring Neurons for ITSM Utility Connector
•Configuring Ivanti Automation in Neurons for ITSM
•Configuring and Syncing Run Books
•Configuring Ivanti Automation Block Properties
•Enabling Automation for Other Business Objects
Intended Audience
This guide is intended for Neurons for ITSM Administrators who are familiar with setting up integrations through the Neurons for ITSM Administration UI. Users should also be familiar with the terminology and navigation of the Ivanti Automation Console in order to set up and configure Global Variables, Modules and Run Books.
Prerequisites
•Ivanti Neurons for ITSM version 2018.1.x or later
•Ivanti Automation version 2018.1 or later
•Download of the Ivanti Neurons for ITSM Utility Connector from the Ivanti Marketplace at the following path: https://marketplace.ivanticloud.com/packages/Ivanti.Service.Manager.Update.Record.Connector/.
•Follow the instructions in the Configuring Neurons for ITSM Utility Connector section (below) to install and configure the connector.
•Ensure the following Global Variables are included in your Ivanti Automation environment (refer to screen shot below):

•Ivanti Service Manager Password: Password to connect to the Neurons for ITSM Server.
•Ivanti Service Manager Role: Role of the user to connect to the Neurons for ITSM Server
•Ivanti Service Manager Tenant: Tenant that must be connected.
•Ivanti Service Manager Tenant URL: URL of the Neurons for ITSM Server that must be connected.
•Ivanti Service Manager UserName: User name to connect to the Neurons for ITSM Server.
•Ivanti Automation, version 2018.1 needs to be installed on one of the computers with all the necessary components such as the Console, as well as at least one Dispatcher, and an Agent.
•The Dispatcher WebAPI is disabled by default. You can enable it by enabling the global setting WebAPI state (Setup > Global Settings > Dispatcher WebAPI section) or the setting on Dispatcher-level (Topology > Dispatchers > Settings > Dispatcher WebAPI section).
•When using the Dispatcher WebAPI in your IA environment, it is also possible to secure communication using HTTPS.
Configuring Neurons for ITSM Utility Connector
1.Save the following two files to the Ivanti Automation server:
•Ivanti Service Manager: Go to Ivanti Marketplace and search for Ivanti Service Manager Utility Connector at the following path: https://marketplace.ivanticloud.com/packages/Ivanti.Service.Manager.Update.Record.Connector/
•Ivanti Solution Installer: Download the Ivanti Marketplace Solution installer.exe at the following path: https://marketplace.ivanticloud.com/Tools/Importer
2.Run the Ivanti Package installer. When prompted browse to the location of the Connector installer. It will have a .nupkg extension.
3.Follow the steps of the unpackaging wizard.
4.You may need to close and reopen Ivanti Automation to see the Ivanti Service Manager General task.
By default, integration to Ivanti Automation is enabled for Request Offerings only. Automation can be enabled for additional business objects as required.
Configuring Ivanti Automation in Neurons for ITSM
- Log in to Neurons for ITSM and select your role as an Administrator.
- Navigate to MORE..., and under My Workspace, select the Ivanti Automation Configuration workspace.
The Ivanti Automation Configuration workspace is displayed with default values.
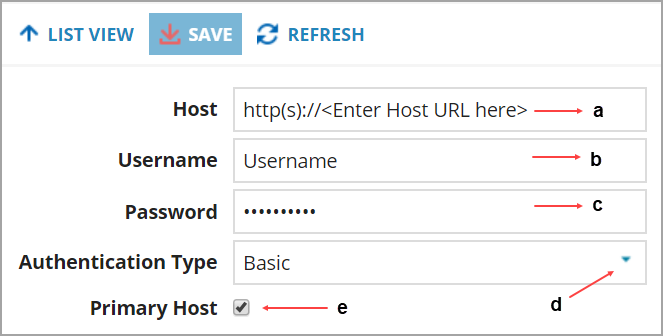
•Host: Base URL to access the Automation Server
•Username: Username that is used to access the Automation Server
•Password: Password that is used to access the Automation Server
•Authentication: Type of authentication to connect the Automation Server
•Primary Host: Option to be selected, if it is a primary host for the Automation Server
- Update the configuration details.
- Click Save to save the configuration details.
Configuring and Syncing Run Books
In Ivanti Automation, you can create and configure specific tasks by creating separate modules. These modules are included in Run Books, which can carry out the set of tasks that are needed to be executed for routine IT tasks. Neurons for ITSM integration requires the ISM_Transaction and p_status to trigger completed/failed in the Neurons for ITSM workflow.
Run Books that have been created must contain defined parameters:
- ISM_TransactionID: RecordID of the Ivanti Automation Transaction Record which will be sent by Neurons for ITSM.
- P_Status: Job status that need to be sent back to Neurons for ITSM using the Update Record task. When configuring the run book, ensure that the parameter setting on the Input tab new input value “When scheduling job” is unchecked.
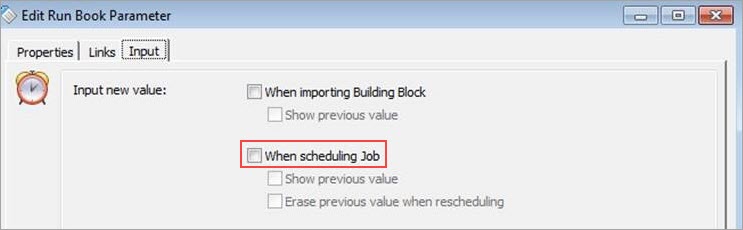
When configuring the Run Book in Automation, valid values for P_Status are ‘Completed’ and ‘Failed’. Make sure to enter in one of these two values only.
Once Run Books have been created, they must be synced with Neurons for ITSM by completing the following steps:
- Log in to Neurons for ITSM and select your role as an Administrator.
- Click the configuration icon
 in the upper right corner.
 - In the left-hand pane, go to Integration Tools and then select Web Service Connections.
- Scroll down to IVNT_Automation_Runbooks and select the Edit icon
 .
. - Follow the steps to run the Integration process and select Next after each step. Once you are done, select Publish.
You can also schedule this to run every day/hours by defining the schedule entry.
Verifying the Synced Run Books
- Back in Neurons for ITSM, leave the Administration UI and from the client UI, open the Request Offering workspace.
- Click Account Unlock to open this Request Offering.
- Select the Plan Request FulFillment Tab.
- Double-click the Ivanti Automation block in the workflow.
The Ivanti Automation Block Properties dialog box opens.
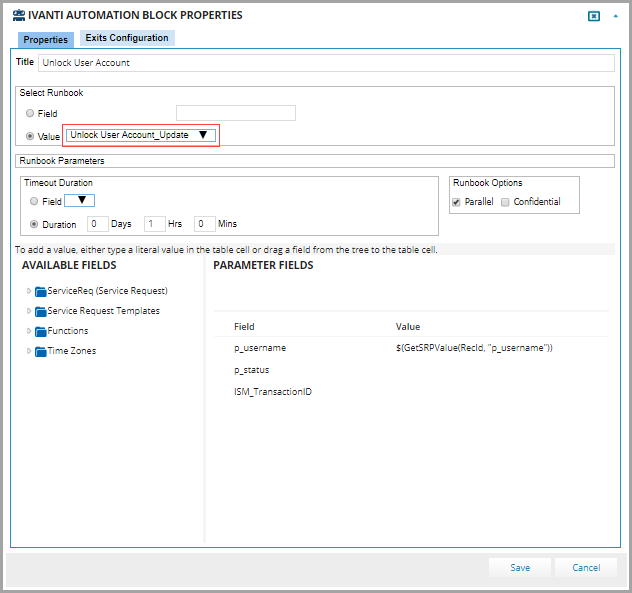
The Value drop-down list shows all the Run Books that have been created.
- Select the appropriate Run Book for this particular task and click Save.
If the synced run books do not appear; give the process a minute or two to complete. If run books still do not appear in the drop down, refer to the Troubleshooting section (below) to review the logs that will help guide you in verifying settings. Once complete, re-run the process to sync run books.
Configuring Ivanti Automation Block Properties
- Log in to Neurons for ITSM and select your role as an Administrator.
- Navigate to MORE..., and under My Workspace, select the Request Offering workspace.
- From the list available, select the desired Request Offering.
- Select the Plan Request Fulfillment tab.
- From the Fulfill as: list, the Workflow option is selected by default.
- Navigate to Integration, and then double-click the Ivanti Automation block in the workflow.
The Ivanti Automation Block Properties dialog box opens.
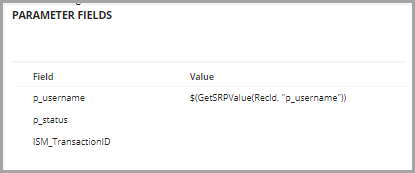
- Depending on the Run Books created in the Ivanti Automation Tool, add or edit the required parameters. For example, for account unlock, only the p_username parameter is required.
In the example below, a service request variable was used as the p_username parameter.
No values are required for p_status or ISM_TransactionID.
- Click Save to save the parameters.
- Click Save on the page to save the entire request offering.
Enabling Automation for Other Business Objects
To enable the ability for other business objects to call runbooks and trigger automation, follow these steps:
Prerequisite:
•Create a relationship between the target business object for example, Change and the IVNT_Automation_Transactions business object.
Example: Relationship between ServiceReq and IVNT_Automation_Transactions
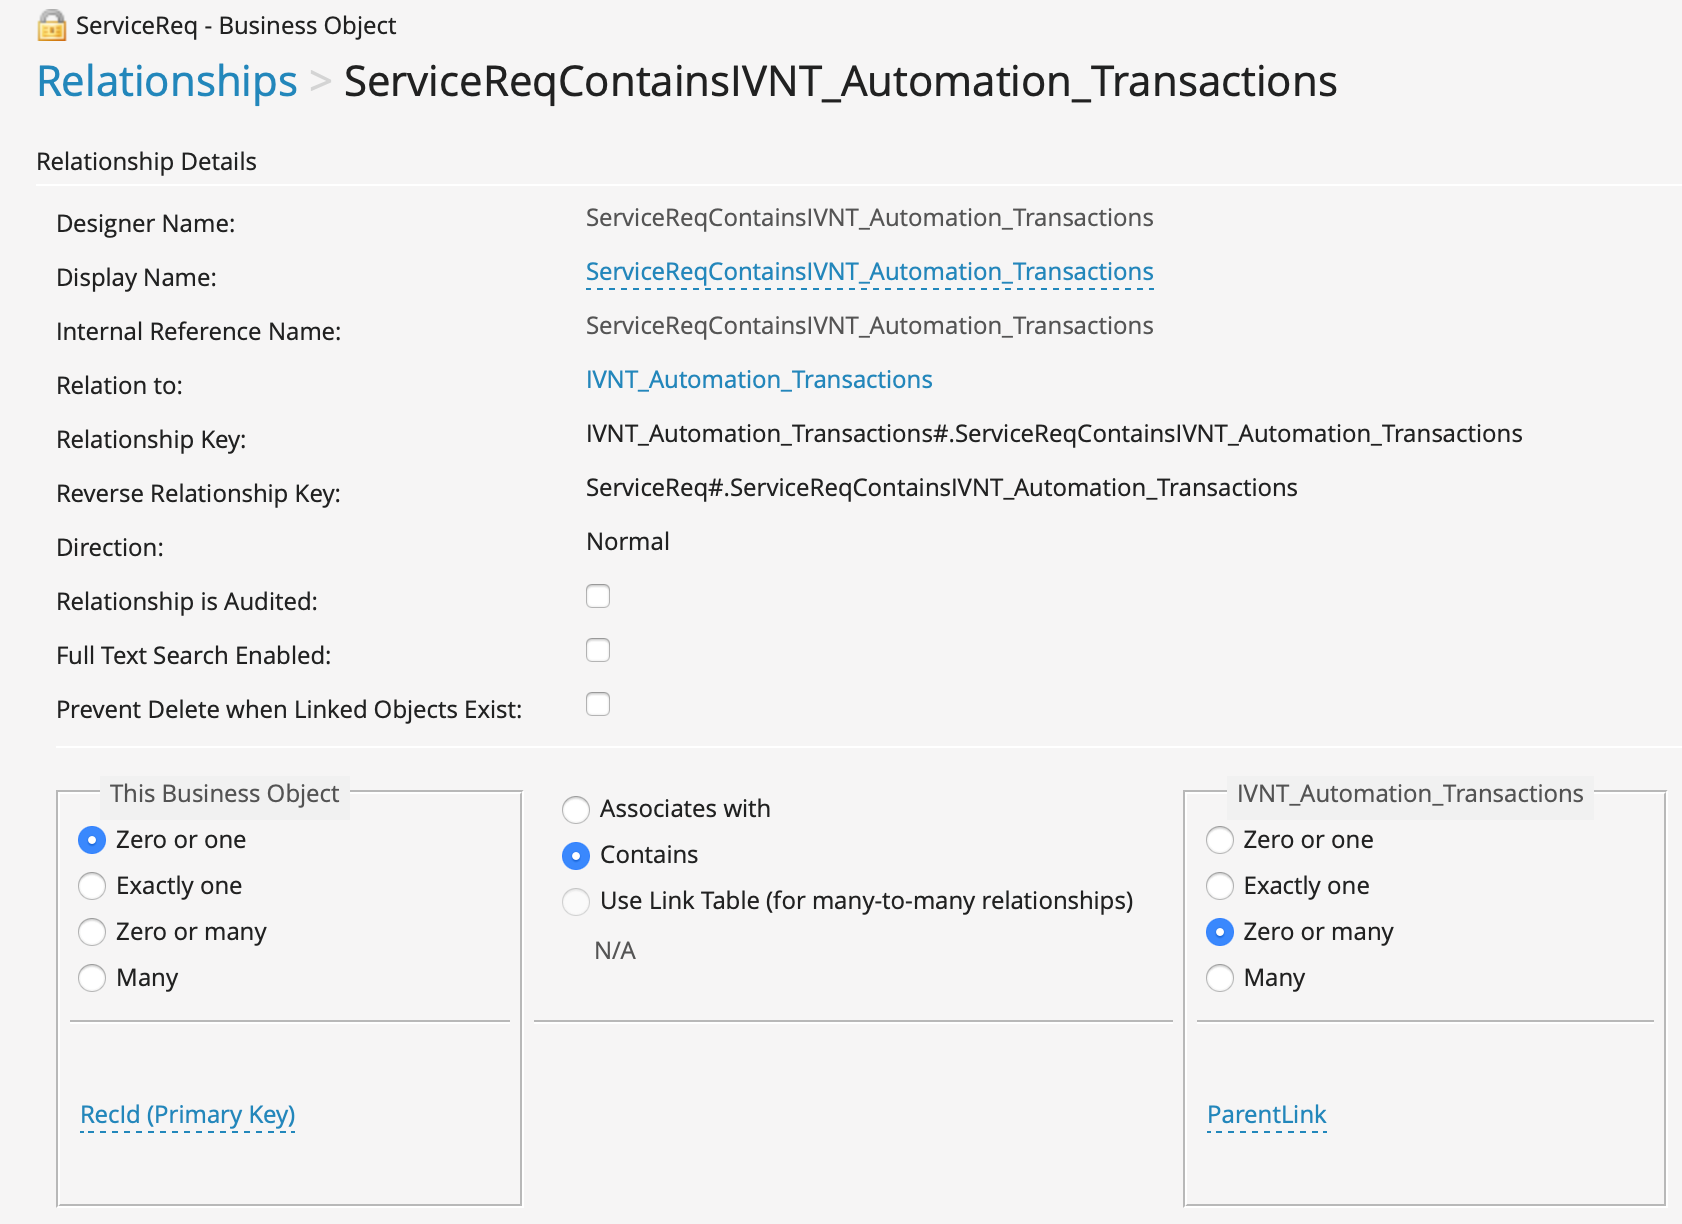
It is mandatory to create a relationship between the target business object and the automation business object before you run the automation workflow, else it will not work.
Steps:
1.Configure the Automation integration per the instructions above; ensuring runbooks sync without issue.
2.Run the workflow.
Field Description Relationship Details Designer Name
The name of the relationship. The system enters a dummy value when you first create the relationship. You can change this name; however, after you save the relationship for the first time, you cannot change this value.
Display Name The relationship name that is displayed in the UI. You can change the name that the system displays in the UI, but that does not change the actual (designer) name of the relationship. Internal Reference Name The exact, internal reference name for this relationship. You set this value when you initially create the relationship. However, after you save the relationship for the first time, you cannot change the value.
This name is part of the relationship key name and the other object relationship key. You use this name in expressions when you refer to other business objects. We recommend that you make the name compact and meaningful because there can be several relationships between the same two database tables.
To set the value, click not set and enter a value.
Relation to The related business object. The system automatically populates this field based on the business object that you selected in step 5 above. Relationship Key Specifies the name of the relationship. You use this name in expressions when you refer to other business objects.
The system automatically populates this field and you cannot change it. It is in the format <relation_to>#.<internal_reference_name>.
Reverse Relationship Key
Specifies the name of the other object relationship. You use this name in expressions when you refer to other business objects.
The system automatically populates this field and you cannot change it. It is in the format <business_object>#.<internal_reference_name>.
Direction
Specifies the direction of the relationship, either normal or reversed. Can be used for troubleshooting.
The system automatically populates this field and you cannot change it.
Relationship is Audited
Specifies if the relationship is to be audited. The system automatically creates an entry in the audit history log when the relationship is used to link or unlink related business objects.
Full Text Search Enabled
Enables the relationship to be included in full-text searches. For queries to return related business objects, at least one field in the business object and related business objects must be enabled for full-text search.
Prevent Delete when Linked Objects Exist
Shown only if the value of the Direction field is set to Normal. Prevents you from unexpectedly deleting linked business objects, which could cause problems. When checked, you cannot delete an instance of the business object type that contains the relationship definition if one or more related business object links exist. This setting only applies to one side of the relationship.
For example, IncidentAssociatesChange is a many-to-many relationship. The Incident business object definition contains a relationship definition for IncidentAssociatesChange. The Change business object definition contains a reverse relationship definition for IncidentAssociatesChange. If you check Prevent Delete when Linked Objects Exist for the Incident business object but do not check that field for the Change business object, when an incident is linked to a change, you cannot delete the incident until the link is removed. However, you can delete the change without first removing the link.
This Business Object [Defines how many parent business objects are permitted relative to the child business object (cardinality)].
Zero or one
Specifies that a parent record in this business object either has a zero-to-one or a one-to-one relationship with a single child record. For example, an employee (parent) can have one service level agreement (child).
Exactly one
Specifies that a parent record in this business object has a one-to-one relationship with a single child record. For example, an employee (parent) can have one service level agreement (child).
Zero or many
Specifies that a parent record in this business object either has a zero to many or a one-to-many relationship with its child records. For example, an employee (parent) has many incidents (children).
Many
Specifies that a parent record in this business object has a one-to-many relationship with its child records. For example, an employee (parent) has many incidents (children).
Binding Type
Associates with
Makes the current business object related to the child business object so that if you delete the current business object, the system does not delete the child business object.
Contains
Makes the current business object the parent business object in a parent-child relationship. If you delete the parent business object, the system deletes the child business object that is specified in the relationship.
Use Link Table (for many-to-many relationships)
Read-only, and only used with many-to-many relationships. Defines how the data is passed between records. In a many-to-many relationship, two business objects are considered related when the appropriate record containing RecIDs of two business objects exists in a link table. If this option is selected, you can use the default Fusion Link table, which contains standard constraints called parent link fields (housed in the child and store the RecID of the parent), or you can enter another database table to be used as a link table.
Specific Transaction Details
Zero or one
Specifies that a parent record in this business object either has a zero-to-one or a one-to-one relationship with a single child record. For example, an employee (parent) can have one service level agreement (child).
Exactly one
Specifies that a parent record in this business object has a one-to-one relationship with a single child record. For example, an employee (parent) can have one service level agreement (child).
Zero or many
Specifies that a parent record in this business object either has a zero to many or a one-to-many relationship with its child records. For example, an employee (parent) has many incidents (children).
Many
Specifies that a parent record in this business object has a one-to-many relationship with its child records. For example, an employee (parent) has many incidents (children).
One of the following:
Primary Key (if normal direction)
Foreign Key (if reversed direction)
The primary key (if this is a normal relationship) or the foreign key (if this is a reversed relationship). The system automatically populates this field, but you can overwrite it.
Troubleshooting
If your Run Book does not execute as planned or the workflow does not execute properly, there are a number of areas you can go to troubleshoot.
Viewing the Automation Transaction Business Object
Ivanti Automation Transaction - This business object logs all the transactions that have been carried out particular to this integration. This provides the status of the job and the logs related to a particular transaction.
Viewing the Integration Log
To view the details of the processed job, you can view the Integration Log workspace.
- Log in to Neurons for ITSM using the Administrator role.
- Open the Integration Log workspace.
- To open the workspace, select More > Integration Log.
- From the Integration Log workspace, view the information in the columns for the list of logs or open a record to view details.
Viewing the Integration Queue
While the job is being processed, you can view the record from the Integration Queue workspace.
After the job is processed, the record will not be available from the Integration Queue workspace. You can then view it from the Integration Log workspace.
- Log in to Neurons for ITSM using the Administrator role.
- Open the Integration Queue workspace.
- To open the workspace, select More > Integration Queue. The workspace will be empty when there are no records to process.
- When the record appears in Queued Status in the Integration Log workspace, then the record appears while it is being processed in the Integration Queue workspace.